Category: Uncategorized

  • How to Spec a Bakery Box: Closures, Sizes, Windows, and Board

    How to Spec a Bakery Box: Closures, Sizes, Windows, and Board

    Ordering custom bakery boxes gets easier once you stop thinking about the design first and start with the structure. A box has a job to do before it carries your logo: it has to hold a specific product at a specific size, close in a way that works at your counter, and survive the trip home. This walkthrough moves through those structural decisions in the order a printer will ask about them, so that when you get to artwork the box underneath it is already right. The design is the fun part, but the spec is what keeps a cake from sliding around or a lid from popping open in a delivery bag.

    Pick the closure style first

    The closure is the box’s personality, and a handful of styles cover almost every bakery. An auto-lock bottom box snaps into a rigid base with no assembly, which is why it is the default for anything with weight behind it, like cheesecakes, bento cakes, and bulkier desserts that would crush a flimsier base. A tuck-top or tuck-front box uses a flap that folds in, a simple structure that assembles fast and suits eclairs, cookies, donuts, and cinnamon buns moving quickly across a retail counter. A two-piece box, a separate base and lid, gives the most premium presentation and the sturdiest hold for decorated cakes, at the cost of a second component to store and assemble. A gable box folds up into a built-in handle, which turns a takeaway order or a party favor into something gift-ready, and a sleeve arrangement, where an outer band slides off an inner tray, delivers the slow, premium unboxing that works for gourmet pastries and product launches.

    There is no universally best closure, only the one that matches your product weight and your counter workflow. Heavy and delicate points toward auto-lock bottoms and two-piece boxes; fast and light points toward tuck styles; gift and premium points toward gable and sleeve.

    Size the box to the product, not the other way around

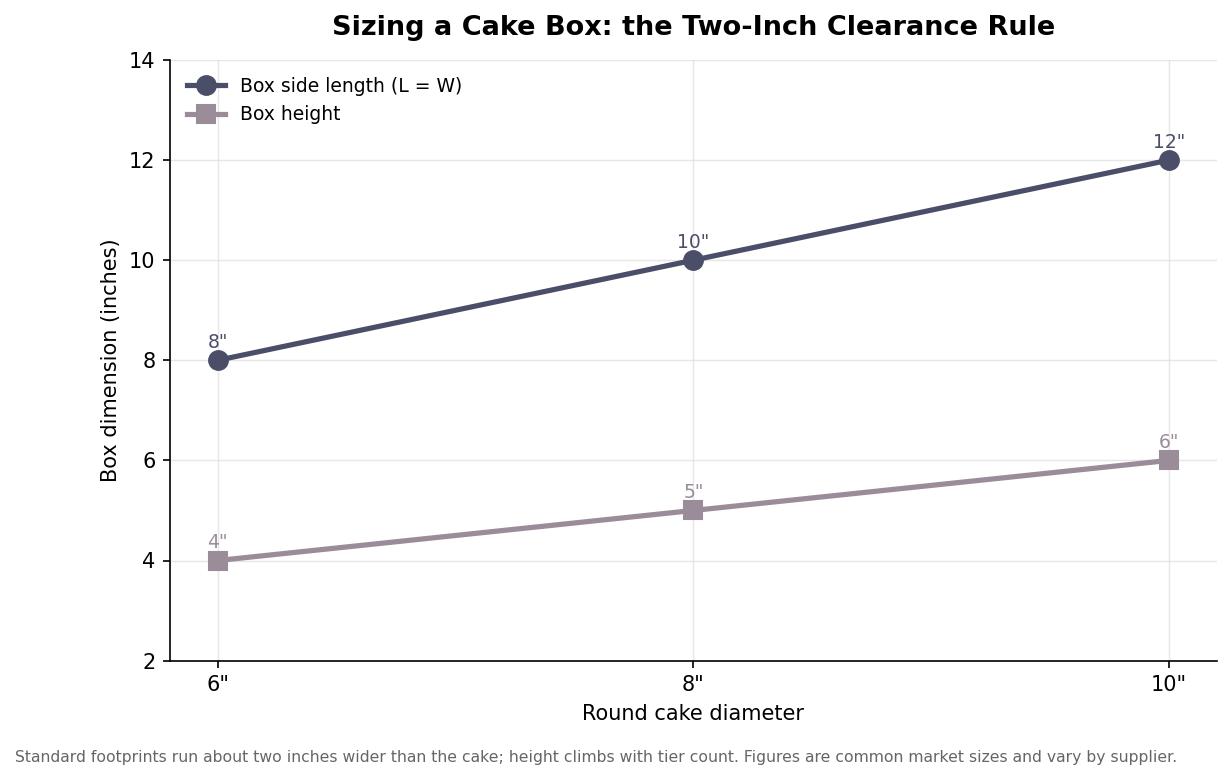
    Once the style is set, the dimensions follow from what goes inside. For round cakes, the reliable pattern is that the box footprint runs about two inches wider than the cake and the height climbs with the number of tiers.
    Line chart showing cake box side length and height increasing with cake diameter, illustrating a two-inch clearance
    Standard cake boxes run about two inches wider than the cake, with height rising for tiers.

    In practice that means a 6-inch cake sits in an 8x8x4 box, an 8-inch cake in a 10x10x5, and a 10-inch cake in a 12x12x6, with sheet cakes taking a lower, wider footprint like 14x10x4. That roughly two-inch clearance is not arbitrary; it leaves room for frosting and a board without the sides smearing the decoration. Cupcakes follow their own counts, from a single 4x4x4 up through a 10x7x4 six-pack and a 14x10x4 dozen, and they almost always want an insert so the frosting is not sliding into the neighbor. Donuts run shallower, commonly 8x8x3.5 for four and 12x12x3.5 for a dozen, while macarons and croissants sit in low, narrow boxes built around their shape.
    Bar chart of typical bakery box depth by product, from 2-inch macaron boxes to 6-inch cake boxes
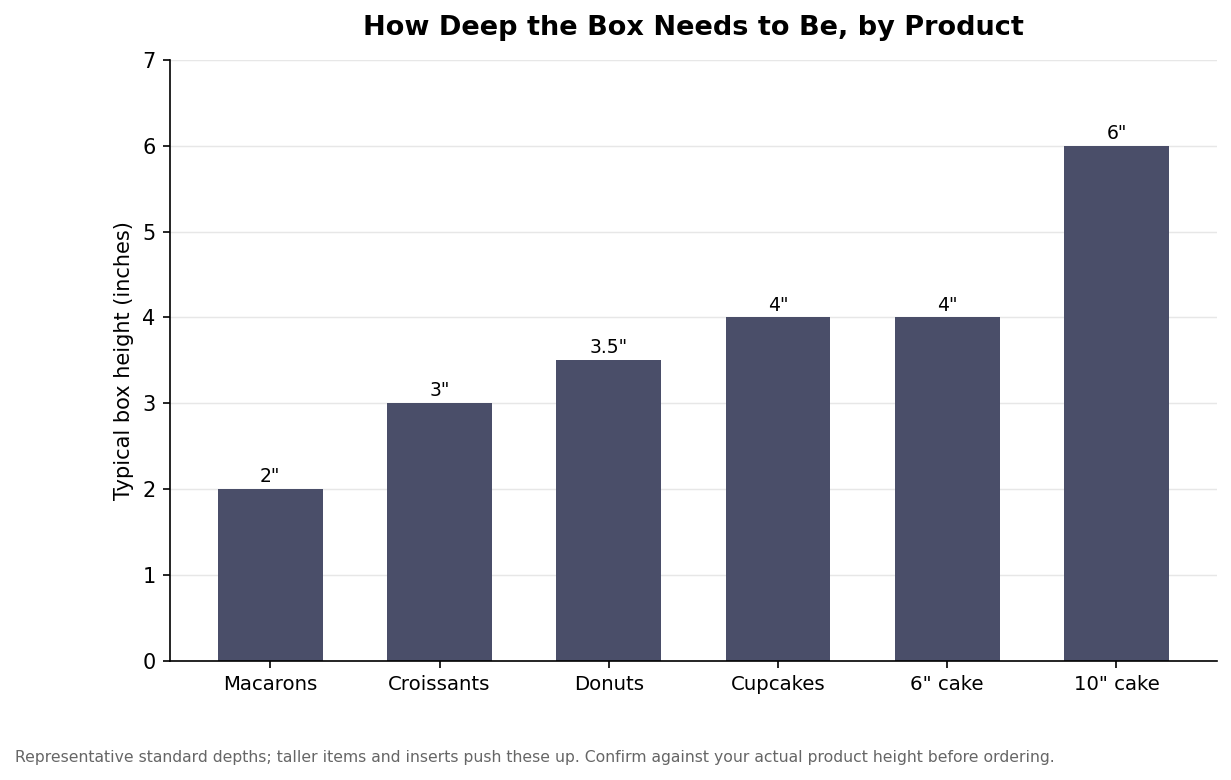
    Box depth tracks the product; measure your item’s tallest point before choosing.

    The depth chart above is the detail people most often get wrong. A box that is right in footprint but too shallow crushes the top of whatever it holds, and one that is too deep lets the product tumble. Measure the tallest point of your actual item, including any wrapper or garnish, and choose a depth that clears it by a small margin rather than trusting the product name on a size chart.

    Decide whether the product should be seen

    A die-cut window turns the box into a display, and for a lot of bakery items that visibility sells the product. Windows are typically cut into kraft or coated stock and backed with a food-safe PET or PP film, and they suit croissants, muffins, brownies, macarons, and anything whose appearance is the pitch. The trade-off is coverage: a window is a hole in your printable area and a small opening in the barrier, so for greasy or moisture-sensitive items you are balancing the appeal of a view against the protection of a solid panel. A good rule is to use windows where the look does the selling and skip them where freshness and grease control matter most.

    Match the material to the load

    The board under all of this is usually a folding paperboard, either a clay-coated white stock that prints crisply or a kraft that reads natural, in a carton caliper that commonly falls in the indicative range of about 16 to 24 points, which is roughly sixteen to twenty-four thousandths of an inch. Lighter calipers are fine for pastries and cookies; heavier cakes and anything that must resist a warm, humid delivery lean toward the thicker end or step up to a corrugated stock for real rigidity. Greasy and moist items also need a grease-resistant treatment on the inside face, and because the rules around certain coatings have tightened, it is worth confirming the barrier is compliant rather than assuming; that topic has its own guide on this site. For the structural decision, the point is simply that a rich, buttery product wants both more caliper and a grease barrier, while a dry cookie can travel in something lighter.

    Put the spec together before the artwork

    Specifying a bakery box is really four small decisions made in sequence: the closure style that fits your product’s weight and your counter, the footprint and depth that fit the item with a little clearance, the choice of window or solid panel, and the board and barrier that match how rich and how far-traveled the product is. Settle those and you hand the printer a box that already works; the logo, colors, and finish then land on a structure that will actually protect what it carries. It is the least glamorous half hour of the order and the one that keeps your product looking as good on arrival as it did in the case.
  • Are Custom Bakery Boxes Food Safe? Grease Barriers, PFAS Rules, and How to Spec a Compliant Box

    Are Custom Bakery Boxes Food Safe? Grease Barriers, PFAS Rules, and How to Spec a Compliant Box

    A bakery box has one job that a shipping carton never has: it is in direct, sustained contact with food that a customer is about to eat. That single fact pulls custom bakery packaging into a set of food-safety expectations that many first-time buyers do not see coming, and the ground under those expectations shifted recently when the grease barrier the whole industry relied on was pulled from the U.S. market. If you are ordering printed boxes for a bakery, a cafe or a dessert shop, here is what “food safe” actually requires in 2026 and how to specify a box that holds up to a buttery croissant without breaking any rules.

    What “food safe” actually means for a printed box

    Food safe is not a marketing adjective; it is a materials requirement. Any surface that touches food has to be made from materials cleared for food contact, which in the United States means the paperboard, the coatings and the adhesives all have to be food-grade rather than generic industrial stock. The most common practical mistake is with ink. Printing inks are not food-contact substances, so the design should live on the outside of the box, and boxes that carry interior printing or that will hold unwrapped, greasy items should use food-safe inks and a barrier between the print and the product. When a supplier calls a box “FDA-compliant,” they are asserting that the substrate and its coatings meet food-contact rules; it is fair to ask them to confirm that in writing, especially for boxes that hold unwrapped product.

    The PFAS phase-out and why your grease barrier changed

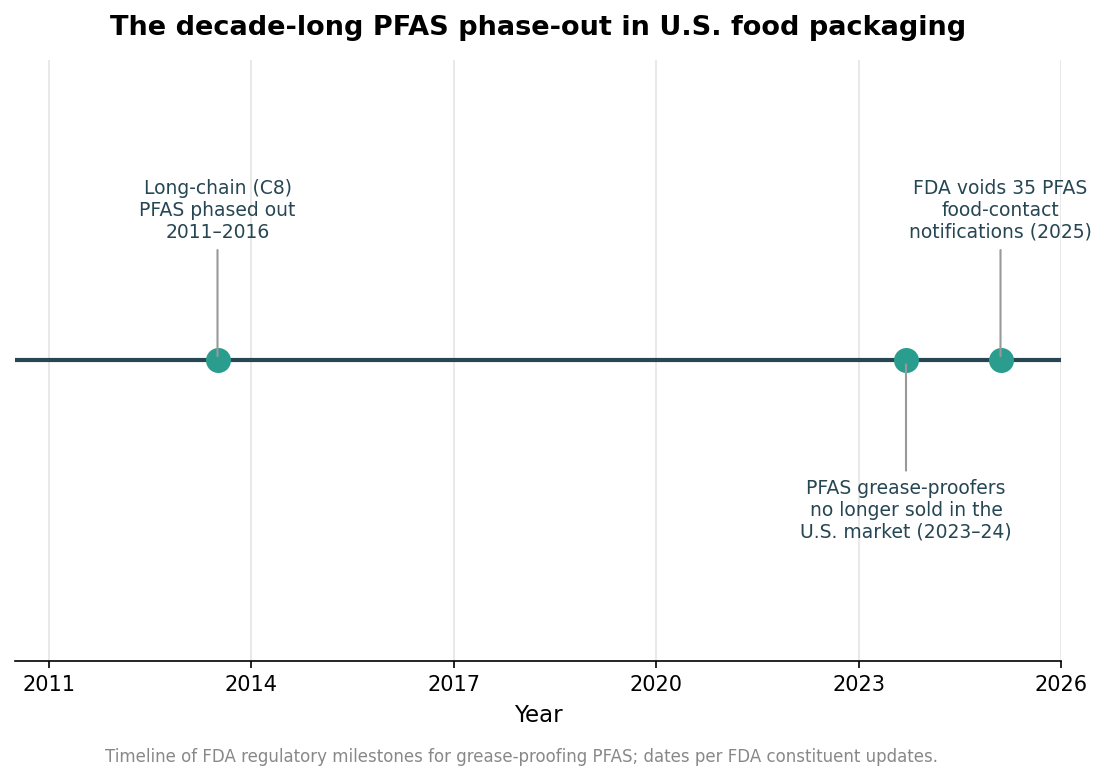
    For decades the cheapest way to make paper resist grease was to treat it with PFAS, the “forever chemicals” that also happen to repel oil beautifully. That era is over. The FDA ran a phased withdrawal that stretched across more than a decade: long-chain C8 compounds were phased out between 2011 and 2016, the shorter-chain 6:2 FTOH chemistry was withdrawn through the early 2020s, and in February 2024 the agency announced that grease-proofing agents containing PFAS were no longer being sold into the U.S. market for use on paper food packaging. In January 2025 the FDA formalized this by ruling that 35 food-contact notifications tied to those substances were no longer effective. A number of states have gone further with their own PFAS-in-packaging bans, so the direction of travel is unambiguous.

    For a bakery ordering boxes, the takeaway is simple: the grease resistance in a compliant box now comes from PFAS-free technology rather than fluorochemicals. That means water-based dispersion coatings, clay or mineral coatings, or purpose-made greaseproof and glassine papers. These alternatives work, but they do not all perform identically, which is why you now have to specify the barrier you need rather than assuming every box repels oil.

    Timeline of the FDA PFAS phase-out in U.S. food packaging from 2011 to 2025
    The PFAS grease-proofing phase-out unfolded over more than a decade, ending U.S. sales in 2024.

    Reading grease resistance: the kit test

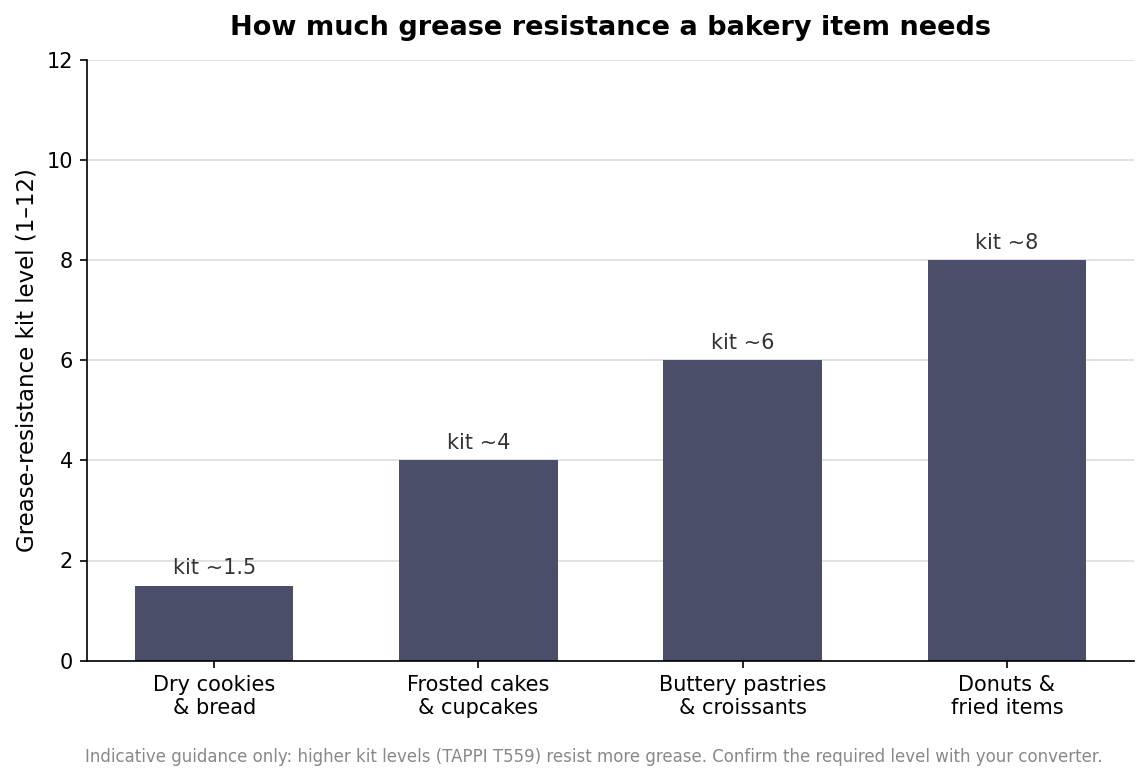
    Grease resistance is measurable, and the standard measure is the kit test, defined in TAPPI method T559. It rates a paper or paperboard on a scale from 1 to 12, where a higher number means the surface resists more aggressive oil and grease. The value of the scale is that it turns a vague promise into a spec you can hold a supplier to. A dry product like a loaf of bread, a bagel or a plain cookie puts almost no oil against the box and needs little or no barrier. Frosted cakes and cupcakes sit in the middle. Buttery, laminated pastries and croissants demand more, and genuinely greasy items such as donuts and anything fried sit at the top of the range. Rather than paying for the highest kit level on every box, match the level to what you actually sell, and ask your converter which kit rating their PFAS-free stock achieves.

    Bar chart of indicative grease-resistance kit levels needed for different bakery items from dry cookies to donuts
    Match the kit level to the product: dry goods need little grease resistance, fried and buttery items need much more.

    Compostable and recyclable claims you can back up

    Sustainability claims are the other area where bakeries get into trouble, usually by calling a box “compostable” when it is only technically recyclable, or vice versa. Certified compostable packaging in North America is verified by BPI against ASTM standards: D6400 for the underlying plastic or bioplastic components and D6868 for coated paper and board. Those standards require that the material disintegrate, biodegrade into carbon dioxide, water and biomass, and leave no toxic residue behind. The important caveat for customers is that this happens under industrial composting conditions, typically 55 to 60 degrees Celsius, with certified items generally breaking down within 90 to 180 days. Home compost piles rarely reach those conditions, so a box that is genuinely compostable in a commercial facility may not break down in a backyard bin. If you print “compostable” on a box, be precise about which kind, because a plain uncoated kraft box and a poly-lined window box have very different end-of-life stories.

    Specifying a compliant box: board, coatings, and printing

    Put the requirements together and a clean specification falls out. Most bakery boxes are made from food-grade solid bleached sulfate or kraft paperboard, commonly in the range of roughly 250 to 350 grams per square meter, or about 14 to 18 point caliper; treat those as indicative starting points and let the box size and weight of the product dictate the final choice. Specify a PFAS-free grease barrier at a kit level suited to your product, keep printing and inks on the exterior or behind a food-safe barrier, and decide your end-of-life story, recyclable or certified compostable, before you approve artwork rather than after. If your box has a clear window, confirm the film is food-safe and understand that a plastic window usually changes how the box can be recycled or composted. A short conversation with your supplier covering food-contact compliance, kit level and disposal claims will catch nearly every problem before it reaches a customer’s hands, and it turns a box from a liability into part of the brand.