Ordering custom bakery boxes gets easier once you stop thinking about the design first and start with the structure. A box has a job to do before it carries your logo: it has to hold a specific product at a specific size, close in a way that works at your counter, and survive the trip home. This walkthrough moves through those structural decisions in the order a printer will ask about them, so that when you get to artwork the box underneath it is already right. The design is the fun part, but the spec is what keeps a cake from sliding around or a lid from popping open in a delivery bag.
Pick the closure style first
The closure is the box’s personality, and a handful of styles cover almost every bakery. An auto-lock bottom box snaps into a rigid base with no assembly, which is why it is the default for anything with weight behind it, like cheesecakes, bento cakes, and bulkier desserts that would crush a flimsier base. A tuck-top or tuck-front box uses a flap that folds in, a simple structure that assembles fast and suits eclairs, cookies, donuts, and cinnamon buns moving quickly across a retail counter. A two-piece box, a separate base and lid, gives the most premium presentation and the sturdiest hold for decorated cakes, at the cost of a second component to store and assemble. A gable box folds up into a built-in handle, which turns a takeaway order or a party favor into something gift-ready, and a sleeve arrangement, where an outer band slides off an inner tray, delivers the slow, premium unboxing that works for gourmet pastries and product launches.
There is no universally best closure, only the one that matches your product weight and your counter workflow. Heavy and delicate points toward auto-lock bottoms and two-piece boxes; fast and light points toward tuck styles; gift and premium points toward gable and sleeve.
Size the box to the product, not the other way around
Once the style is set, the dimensions follow from what goes inside. For round cakes, the reliable pattern is that the box footprint runs about two inches wider than the cake and the height climbs with the number of tiers.
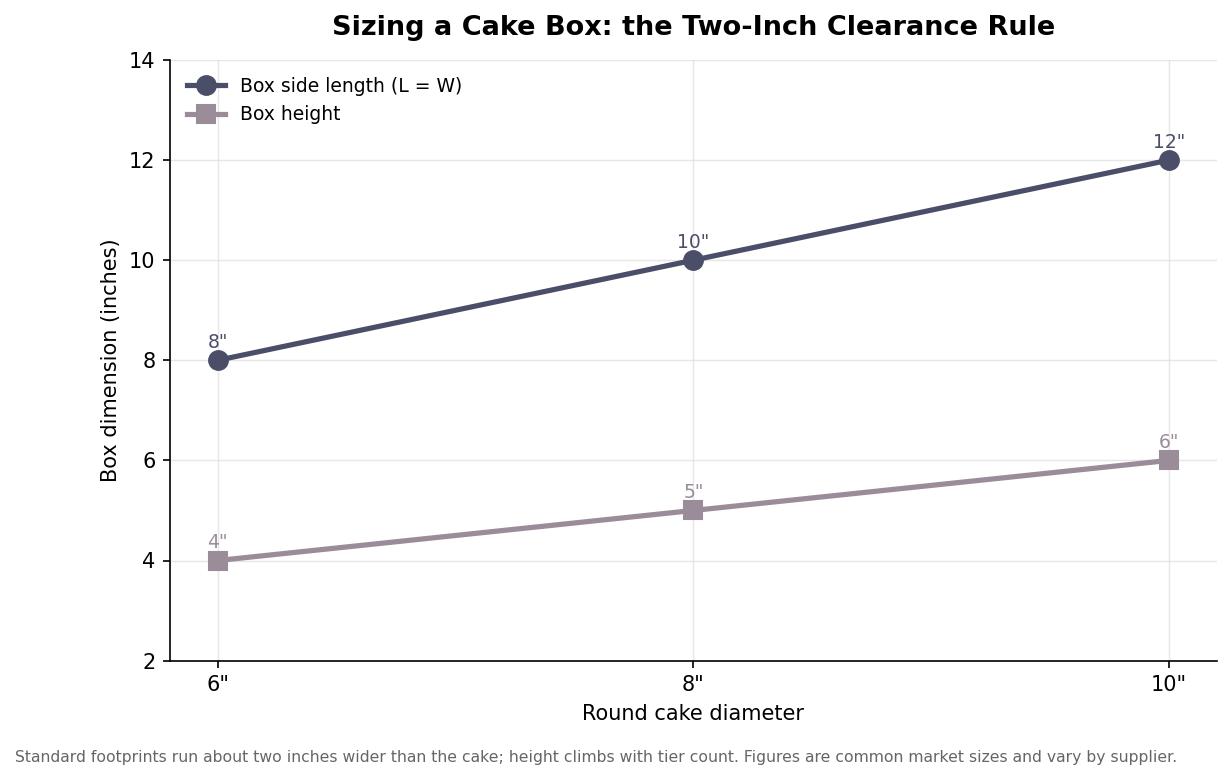
In practice that means a 6-inch cake sits in an 8x8x4 box, an 8-inch cake in a 10x10x5, and a 10-inch cake in a 12x12x6, with sheet cakes taking a lower, wider footprint like 14x10x4. That roughly two-inch clearance is not arbitrary; it leaves room for frosting and a board without the sides smearing the decoration. Cupcakes follow their own counts, from a single 4x4x4 up through a 10x7x4 six-pack and a 14x10x4 dozen, and they almost always want an insert so the frosting is not sliding into the neighbor. Donuts run shallower, commonly 8x8x3.5 for four and 12x12x3.5 for a dozen, while macarons and croissants sit in low, narrow boxes built around their shape.
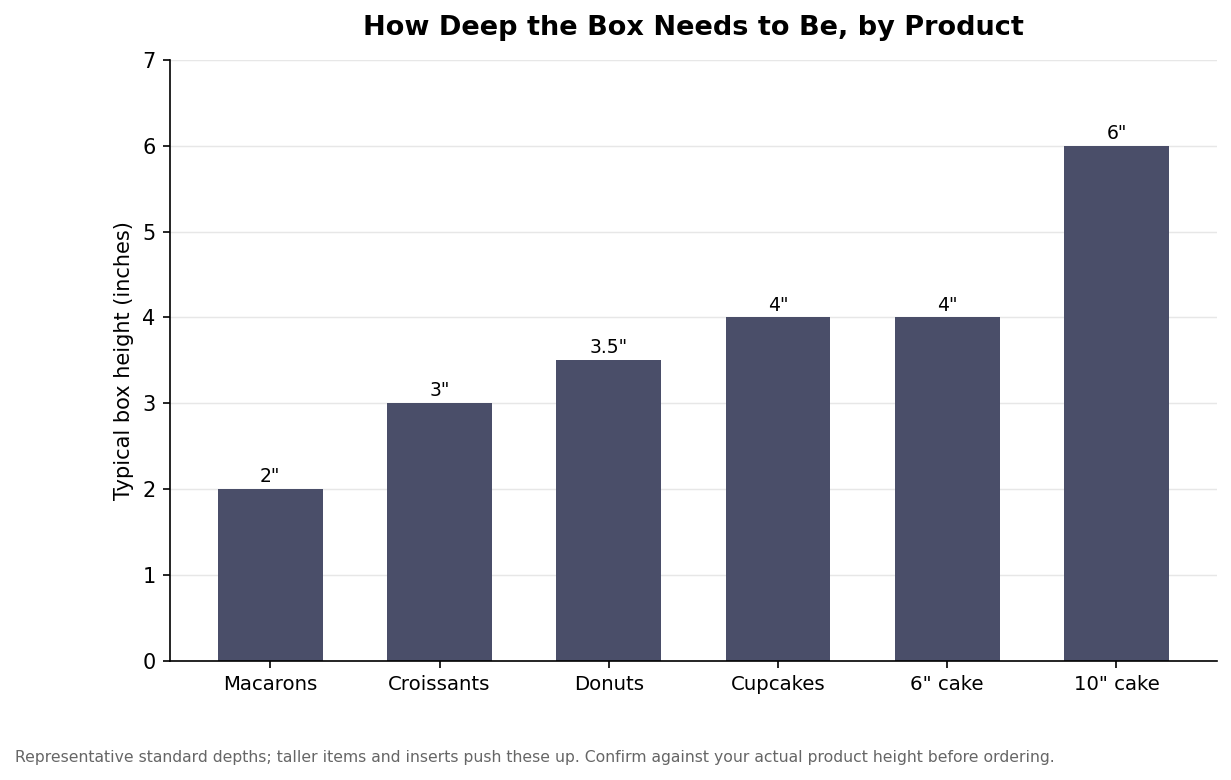
The depth chart above is the detail people most often get wrong. A box that is right in footprint but too shallow crushes the top of whatever it holds, and one that is too deep lets the product tumble. Measure the tallest point of your actual item, including any wrapper or garnish, and choose a depth that clears it by a small margin rather than trusting the product name on a size chart.
Decide whether the product should be seen
A die-cut window turns the box into a display, and for a lot of bakery items that visibility sells the product. Windows are typically cut into kraft or coated stock and backed with a food-safe PET or PP film, and they suit croissants, muffins, brownies, macarons, and anything whose appearance is the pitch. The trade-off is coverage: a window is a hole in your printable area and a small opening in the barrier, so for greasy or moisture-sensitive items you are balancing the appeal of a view against the protection of a solid panel. A good rule is to use windows where the look does the selling and skip them where freshness and grease control matter most.
Match the material to the load
The board under all of this is usually a folding paperboard, either a clay-coated white stock that prints crisply or a kraft that reads natural, in a carton caliper that commonly falls in the indicative range of about 16 to 24 points, which is roughly sixteen to twenty-four thousandths of an inch. Lighter calipers are fine for pastries and cookies; heavier cakes and anything that must resist a warm, humid delivery lean toward the thicker end or step up to a corrugated stock for real rigidity. Greasy and moist items also need a grease-resistant treatment on the inside face, and because the rules around certain coatings have tightened, it is worth confirming the barrier is compliant rather than assuming; that topic has its own guide on this site. For the structural decision, the point is simply that a rich, buttery product wants both more caliper and a grease barrier, while a dry cookie can travel in something lighter.
Put the spec together before the artwork
Specifying a bakery box is really four small decisions made in sequence: the closure style that fits your product’s weight and your counter, the footprint and depth that fit the item with a little clearance, the choice of window or solid panel, and the board and barrier that match how rich and how far-traveled the product is. Settle those and you hand the printer a box that already works; the logo, colors, and finish then land on a structure that will actually protect what it carries. It is the least glamorous half hour of the order and the one that keeps your product looking as good on arrival as it did in the case.
Leave a Reply